SpringBoot2 | 第十五篇:整合Cache

​ 数据库的数据 是存储在 硬盘上 的,频繁访问 性能 较 低。而 缓存数据 存储在 内存 中,访问 性能 比硬盘 快 了一个数量级。如果将一些需要 频繁查询 的热数据放到 缓存 中,可以大大减轻数据库的访问压力。

[TOC]

Spring Cache

​ Spring 3.1 引入了激动人心的基于注释(annotation)的缓存(cache)技术,它本质上不是一个具体的缓存实现方案(例如 EHCache 或者 OSCache),而是一个对缓存使用的抽象,通过在既有代码中添加少量它定义的各种 annotation,即能够达到 缓存方法的返回对象 的效果。

​ Spring 的缓存技术还具备相当的灵活性,不仅能够使用 SpEL(Spring Expression Language)来定义缓存的 key 和各种 condition,还提供开箱即用的缓存临时存储方案,也支持主流的专业缓存例如 EHCache 集成。

声明式缓存

​ Spring 定义 CacheManager 和 Cache 接口用来统一不同的缓存技术。例如 JCache、 EhCache、 Hazelcast、 Guava、 Redis 等。在使用 Spring 集成 Cache 的时候,我们只需要提供实现的 CacheManager 的 Bean,然后在方法上写一行注解,声明一下这个方法的查询是要用缓存的即可。

Spring Boot默认集成CacheManager

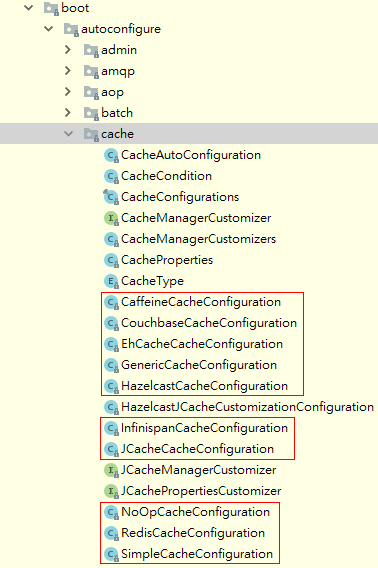
SpringBoot 已经为我们自动配置了多个 CacheManager 的实现。
1539528857220

​ 我们可以在 application.yml 中用spring.cache.type 指定缓存供应商类型(默认情况下,根据环境自动检测),如果 SpringBoot 在配置中找不到用户指定的 Cache Providers ,那么 ConcurrentMapCacheManager 会被作为 缓存管理器。

环境/版本一览:

  • 开发工具:Intellij IDEA 2018.2.2
  • springboot: 2.0.5.RELEASE
  • jdk:1.8.0_171
  • maven:3.3.9
  • spring-boot-starter-cache:2.0.5.RELEASE

1、pom.xml

1
2
3
4
5
6
7
8
9
10
11
12
13
14
15
16
17
<dependencies>
<!-- 引入缓存依赖 -->
<dependency>
<groupId>org.springframework.boot</groupId>
<artifactId>spring-boot-starter-cache</artifactId>
</dependency>
<dependency>
<groupId>org.springframework.boot</groupId>
<artifactId>spring-boot-starter-test</artifactId>
<scope>test</scope>
</dependency>
<dependency>
<groupId>org.projectlombok</groupId>
<artifactId>lombok</artifactId>
<version>1.16.22</version>
</dependency>
</dependencies>

2、entity

实体必须实现序列化

1
2
3
4
5
6
7
8
9
10
11
12
13
14
15
16
17
18
19
20
21
package com.fatal.entity;

import lombok.Data;
import lombok.experimental.Accessors;

import java.io.Serializable;

/**
* User 实体
* @author: Fatal
* @date: 2018/10/14 0014 17:05
*/
@Data
@Accessors(chain = true)
public class User implements Serializable {

private Long id;
private String username;
private String password;

}

3、dao

IUserDao.java

1
2
3
4
5
6
7
8
9
10
11
12
13
14
15
16
17
18
19
20
21
package com.fatal.dao;

import com.fatal.entity.User;

/**
* User 数据库访问层
* @author: Fatal
* @date: 2018/10/14 0014 17:08
*/
public interface IUserDao {

/** 增或改 */
User insertOrUpdate(User user);

/** 删 */
User remove(Long id);

/** 查 */
User selectById(Long id);

}

UserDaoImpl.java

1
2
3
4
5
6
7
8
9
10
11
12
13
14
15
16
17
18
19
20
21
22
23
24
25
26
27
28
29
30
31
32
33
34
35
36
37
38
39
40
41
42
43
44
45
46
package com.fatal.dao.impl;

import com.fatal.dao.IUserDao;
import com.fatal.entity.User;
import org.springframework.stereotype.Repository;

import java.util.*;

/**
* User 数据库访问层实现
* @author: Fatal
* @date: 2018/10/14 0014 17:11
*/
@Repository
public class UserDaoImpl implements IUserDao {

/** 模拟数据库 */
private static Map<Long, User> db = new HashMap<>();

static {
// 初始化数据库
db.put(1l,new User().setId(1l).setUsername("米彩").setPassword("18"));
db.put(2l,new User().setId(2l).setUsername("米琪").setPassword("19"));
db.put(3l,new User().setId(3l).setUsername("小米").setPassword("20"));
}

@Override
public User insertOrUpdate(User user) {
if (user.getId() == null) {
user.setId(System.currentTimeMillis());
}
db.put(user.getId(), user);
return user;
}

@Override
public User remove(Long id) {
return db.remove(id);
}

@Override
public User selectById(Long id) {
return db.get(id);
}

}

4、service

IUserService.java

1
2
3
4
5
6
7
8
9
10
11
12
13
14
15
16
17
18
19
20
21
package com.fatal.service;

import com.fatal.entity.User;

/**
* User 服务
* @author: Fatal
* @date: 2018/10/14 0014 17:28
*/
public interface IUserService {

/** 增或改 */
User insertOrUpdate(User user);

/** 删 */
User remove(Long id);

/** 查 */
User selectById(Long id);

}

UserServiceImpl.java

声明式很简单,在指定方法上标注上对应的注解即可

1
2
3
4
5
6
7
8
9
10
11
12
13
14
15
16
17
18
19
20
21
22
23
24
25
26
27
28
29
30
31
32
33
34
35
36
37
38
39
40
41
42
43
44
45
46
47
48
package com.fatal.service.impl;

import com.fatal.dao.IUserDao;
import com.fatal.entity.User;
import com.fatal.service.IUserService;
import lombok.extern.slf4j.Slf4j;
import org.springframework.beans.factory.annotation.Autowired;
import org.springframework.cache.annotation.CacheEvict;
import org.springframework.cache.annotation.CachePut;
import org.springframework.cache.annotation.Cacheable;
import org.springframework.stereotype.Service;

/**
* @author: Fatal
* @date: 2018/10/14 0014 17:28
*/
@Slf4j
@Service
public class UserServiceImpl implements IUserService {

@Autowired
private IUserDao dao;

@Override
@CachePut(cacheNames = "user", key = "#user.id")
public User insertOrUpdate(User user) {
// 健壮性判断...
log.info("进入【insertOrUpdate】方法");
return dao.insertOrUpdate(user);
}

@Override
@CacheEvict(cacheNames = "user", key = "#id")
public User remove(Long id) {
// 健壮性判断...
log.info("进入【remove】方法");
return dao.remove(id);
}

@Override
@Cacheable(cacheNames = "user", key = "#id")
public User selectById(Long id) {
// 健壮性判断...
log.info("进入【selectById】方法");
return dao.selectById(id);
}

}

5、Application

使用@EnableCaching开启 Cache 缓存

1
2
3
4
5
6
7
8
9
10
11
12
13
14
package com.fatal;

import org.springframework.boot.SpringApplication;
import org.springframework.boot.autoconfigure.SpringBootApplication;
import org.springframework.cache.annotation.EnableCaching;

@SpringBootApplication
@EnableCaching // 启用缓存
public class Chapter15Application {

public static void main(String[] args) {
SpringApplication.run(Chapter15Application.class, args);
}
}

6、Test

UserServiceImplTest.java

测试缓存

1
2
3
4
5
6
7
8
9
10
11
12
13
14
15
16
17
18
19
20
21
22
23
24
25
26
27
28
29
30
31
32
33
34
35
36
37
38
39
40
41
42
43
44
45
46
47
48
49
50
51
52
53
54
55
56
57
58
59
60
package com.fatal.service.impl;

import com.fatal.entity.User;
import com.fatal.service.IUserService;
import lombok.extern.slf4j.Slf4j;
import org.junit.Test;
import org.junit.runner.RunWith;
import org.springframework.beans.factory.annotation.Autowired;
import org.springframework.boot.test.context.SpringBootTest;
import org.springframework.test.context.junit4.SpringRunner;

import static org.junit.Assert.*;

/**
* @author: Fatal
* @date: 2018/10/14 0014 17:32
*/
@Slf4j
@SpringBootTest
@RunWith(SpringRunner.class)
public class UserServiceImplTest {

@Autowired
private IUserService service;

@Test
public void insertOrUpdate() {
User user = new User().setUsername("micai").setPassword("18");
User result = service.insertOrUpdate(user);
log.info("【添加成功】 user -> {}", result);

result.setUsername("miqi");
result = service.insertOrUpdate(result);
log.info("【修改成功】 user -> {}", result);
}

@Test
public void remove() {
User result = service.remove(1l);
log.info("【删除成功】 user -> {}", result);
}

/**
* 使用该方法即可测试缓存的存在了
*/
@Test
public void selectById() {
User user = new User().setUsername("micai").setPassword("18");
User result = service.insertOrUpdate(user);
log.info("【添加成功】 user -> {}", result);

/**
* 因为在添加的时候已经把对象放到缓存中了,所以下面方法执行后,@Cacheable判断
* 出了有缓存,直接从缓存中拿数据,没进入方法体。所以没显示`进入【selectById】方法
*/
User select = service.selectById(result.getId());
log.info("【查询成功】 user -> {}", select);
}

}

Chapter15ApplicationTests.java

测试CacheManager的默认实现

1
2
3
4
5
6
7
8
9
10
11
12
13
14
15
16
17
18
19
20
21
22
23
24
25
26
27
package com.fatal;

import org.junit.Test;
import org.junit.runner.RunWith;
import org.springframework.beans.factory.annotation.Autowired;
import org.springframework.boot.test.context.SpringBootTest;
import org.springframework.cache.CacheManager;
import org.springframework.cache.concurrent.ConcurrentMapCacheManager;
import org.springframework.test.context.junit4.SpringRunner;

@RunWith(SpringRunner.class)
@SpringBootTest
public class Chapter15ApplicationTests {

@Autowired
private CacheManager cacheManager;

@Autowired
private ConcurrentMapCacheManager concurrentMapCacheManager;

@Test
public void contextLoads() {
System.out.println(cacheManager);
System.out.println(concurrentMapCacheManager);
}

}

显示

测试缓存

​ 执行测试方法 selectById ,在添加完后,添加数据被存放到缓存中,所以,后面查询的时候数据从缓存中取,所以没显示 进入【selectById】方法

1539530528763

测试CacheManager的默认实现

​ 用户没有作配置的情况下,CacheManager 取得是 ConcurrentMapCacheManager,所以下方显示为同一个 实例

1539567890228

笔记

根据条件操作缓存

​ 根据条件操作缓存内容并不影响数据库操作,条件表达式返回一个布尔值,true/false,当条件为true,则进行缓存操作,否则直接调用方法执行的返回结果。

  • 长度: @CachePut(value = "user", key = "#user.id",condition = "#user.username.length() < 10") 只缓存用户名长度少于10的数据
  • 大小: @Cacheable(value = "user", key = "#id",condition = "#id < 10") 只缓存ID小于10的数据
  • 组合: @Cacheable(value="user",key="#user.username.concat(#user.password)")
  • 提前操作: @CacheEvict(value="user",beforeInvocation=true) 加上beforeInvocation=true后,不管内部是否报错,缓存都将被清除,默认情况为false

key 和 condition 的变量取自参数

注解介绍

@Cacheable (根据方法的请求参数对其结果进行缓存)

  • key: 缓存的 key,可以为空,如果指定要按照 SpEL 表达式编写,如果不指定,则缺省按照方法的所有参数进行组合(如:@Cacheable(value="user",key="#userName"))
  • value: 缓存的名称,必须指定至少一个(如:@Cacheable(value="user") 或者 @Cacheable(value={"user1","use2"}))
  • condition: 缓存的条件(针对参数),可以为空,使用 SpEL 编写,返回 true 或者 false,只有为 true 才进行缓存(如:@Cacheable(value = "user", key = "#id",condition = "#id < 10"))
  • unless:缓存的条件(针对返回结果),可以为空,使用 SpEL 编写,返回 true 或者 false,只有为 true 才进行缓存(如:@Cacheable(value = "user", key = "#id", unless = "#result.getCode() != 0")。result 指返回的对象,这里指 ResultVO。 因为错误的结果我们不可能缓存进来嘛)

@CachePut (根据方法的请求参数对其结果进行缓存,和 @Cacheable 不同的是,它每次都会触发真实方法的调用 )

注:它要求标注的方法的返回值类型与name相同的标注有@Cacheable方法的返回值类型一致,否则报错(类型转换异常)

  • key: 同上
  • value: 同上
  • condition: 同上

@CachEvict (根据条件对缓存进行清空)

  • key: 同上
  • value: 同上
  • condition: 同上
  • allEntries: 是否清空当前 value 下的所有缓存内容,缺省为 false,如果指定为 true,则方法调用后将立即清空所有缓存(如:@CacheEvict(value = "user", allEntries = true))

    注意:默认情况下,只删除关联 key下的缓存;需要特别注意的是,当 allEntries = true 时,不允许设置 key 值。(二选一)

  • beforeInvocation: 是否在方法执行前就清空,缺省为 false,如果指定为 true,则在方法还没有执行的时候就清空缓存,缺省情况下,如果方法执行抛出异常,则不会清空缓存(如:@CacheEvict(value = "user", key = "#id", beforeInvocation = true))

@CacheEvict 中的 allEntries 与 beforeInvocation 的区别

​ 在 Spring Cache 中,@CacheEvict 是清除缓存的注解。其中注解参数可以只有 value 和 key ,意思是清除在 value 值空间中的 key 值数据,此时默认在当前注解方法成功执行之后再清除。这时候就会存在一个问题,也许你的注解方法成功执行了删除操作,但是后续代码 抛出异常 导致未能清除缓存,下次查询时依旧从缓存中去读取,这时查询到的结果值是删除操作之前的值。

​ 有一个简单的解决办法,在注解参数里面加上 beforeInvocation为 true,意思是说当执行这个方法之前执行清除缓存的操作,这样 不管这个方法执行成功与否,该缓存都将不存在。

​ 当注解参数加上 allEntries 为 true 时,意思是说这个清除缓存是 清除 当前 value 值空间下 的所有缓存数据。

探究

为什么 CacheManager 的默认实现是 ConcurrentMapCacheManager?

​ 官方文档说:

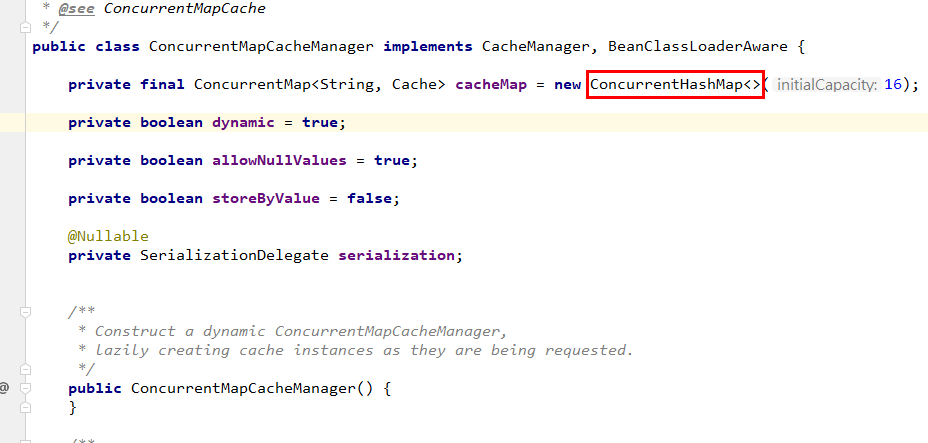
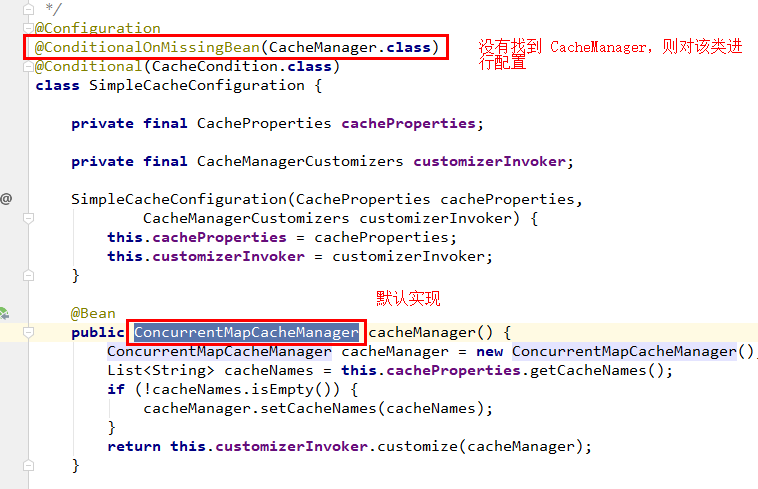
​ 如果找不到任何 CacheManager 的提供者(实现),那么将会以 ConcurrentMapCacheManager (底层使用 ConcurrentHashMap)作为一个 简单的缓存管理器 从而进行默认配置。

​ 看一下源码:

这是缓存配置类 SimpleCacheConfiguration
1539566875395

这里是缓存管理器 ConcurrentCacheManager 的内部实现
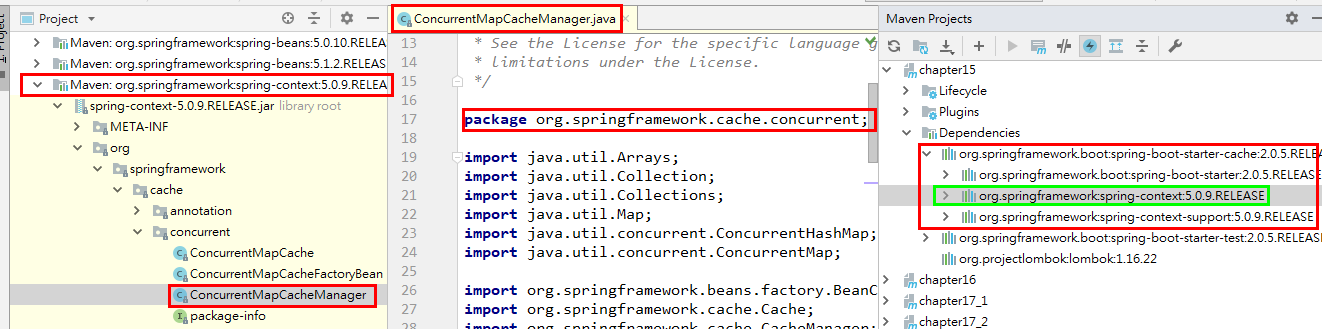
1543393996796

1539566912084

分析

​ 其实所有的 Cache 缓存配置类,Spring Boot 都提供了默认 配置(就差你引入依赖就可以用了),我们引入 spring-boot-starter-data-cache 后,该依赖提供了 SimpleCacheConfiguration 需要的缓存管理器实现 ConcurrentMapCacheManager ;

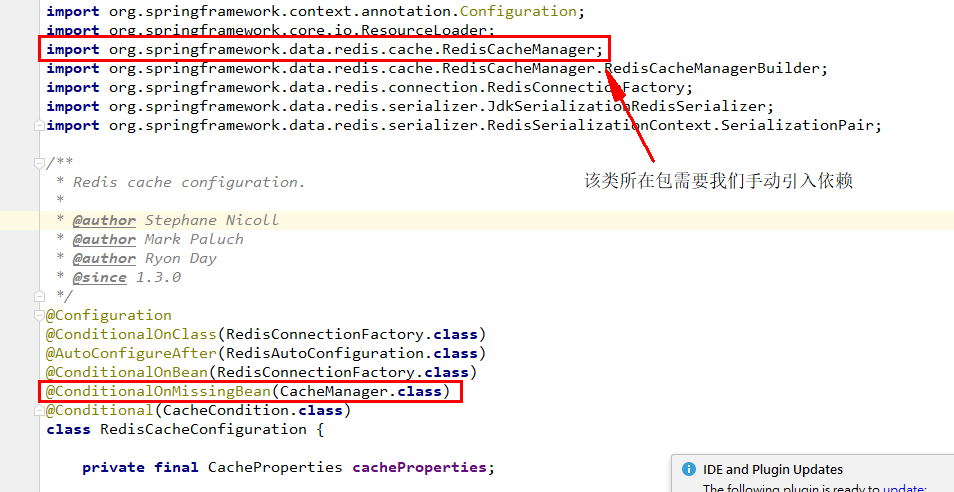
而像其它缓存管理器 实现,比如 Redis 缓存管理器 RedisCacheManager 需要的依赖 spring-boot-starter-data-redis,要求我们手动去添加;

当我们没有添加 指定管理器 需要的依赖, ConcurrentMapCacheManager 就成了 默认 的缓存管理器;当我们引入的话, SpringBoot 会扫描出来,并将其 替代 默认的缓存管理器。

(换行的话可能方便看)

​ 具体思路可参考源码:

1539567534452

参考资料

spring-cache文档

Spring Boot官方文档

SpringBoot非官方教程 | 第十三篇:springboot集成spring cache

一起来学SpringBoot | 第十篇:使用Spring Cache集成Redis

Spring缓存注解@Cacheable,@CachePut , @CacheEvict使用

Caching Data with Spring

总结

SpringBoot的知识已经有前辈在我们之前探索了。比较喜欢的博主有:唐亚峰 | Battcn、方志朋的专栏、程序猿DD、纯洁的微笑。对这门技术感兴趣的可以去他们的博客逛逛。谢谢他们的分享~~

以上文章是我用来学习的Demo,都是基于 SpringBoot2.x 版本。

源码地址: https://github.com/ynfatal/springboot2-learning/tree/master/chapter15

学习 唐亚峰、方志朋 前辈的经验