SpringBoot2 | 第十五篇:整合Cache

数据库的数据 是存储在 硬盘上 的,频繁访问 性能。而 缓存数据 存储在 内存 中,访问 性能 比硬盘 了一个数量级。如果将一些需要 频繁查询 的热数据放到 缓存 中,可以大大减轻数据库的访问压力。

[TOC]

Spring Cache

Spring 3.1 引入了激动人心的基于注释(annotation)的缓存(cache)技术,它本质上不是一个具体的缓存实现方案(例如 EHCache 或者 OSCache),而是一个对缓存使用的抽象,通过在既有代码中添加少量它定义的各种 annotation,即能够达到 缓存方法的返回对象 的效果。

Spring 的缓存技术还具备相当的灵活性,不仅能够使用 SpEL(Spring Expression Language)来定义缓存的 key 和各种 condition,还提供开箱即用的缓存临时存储方案,也支持主流的专业缓存例如 EHCache 集成。

声明式缓存

Spring 定义 CacheManagerCache 接口用来统一不同的缓存技术。例如 JCache、 EhCache、 Hazelcast、 Guava、 Redis 等。在使用 Spring 集成 Cache 的时候,我们只需要提供实现的 CacheManagerBean,然后在方法上写一行注解,声明一下这个方法的查询是要用缓存的即可。

Spring Boot默认集成CacheManager

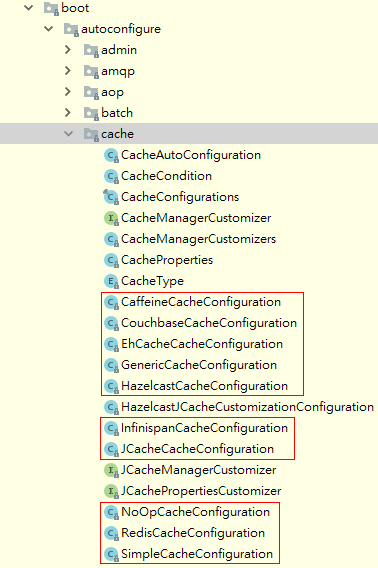
SpringBoot 已经为我们自动配置了多个 CacheManager 的实现。
1539528857220

​ 我们可以在 application.yml 中用spring.cache.type 指定缓存供应商类型(默认情况下,根据环境自动检测),如果 SpringBoot 在配置中找不到用户指定的 Cache Providers ,那么 ConcurrentMapCacheManager 会被作为 缓存管理器

环境/版本一览:

  • 开发工具:Intellij IDEA 2018.2.2
  • springboot: 2.0.5.RELEASE
  • jdk:1.8.0_171
  • maven:3.3.9
  • spring-boot-starter-cache:2.0.5.RELEASE

1、pom.xml

1
2
3
4
5
6
7
8
9
10
11
12
13
14
15
16
17
<dependencies>
<!-- 引入缓存依赖 -->
<dependency>
<groupId>org.springframework.boot</groupId>
<artifactId>spring-boot-starter-cache</artifactId>
</dependency>
<dependency>
<groupId>org.springframework.boot</groupId>
<artifactId>spring-boot-starter-test</artifactId>
<scope>test</scope>
</dependency>
<dependency>
<groupId>org.projectlombok</groupId>
<artifactId>lombok</artifactId>
<version>1.16.22</version>
</dependency>
</dependencies>

2、entity

实体必须实现序列化

1
2
3
4
5
6
7
8
9
10
11
12
13
14
15
16
17
18
19
20
21
package com.fatal.entity;

import lombok.Data;
import lombok.experimental.Accessors;

import java.io.Serializable;

/**
* User 实体
* @author: Fatal
* @date: 2018/10/14 0014 17:05
*/
@Data
@Accessors(chain = true)
public class User implements Serializable {

private Long id;
private String username;
private String password;

}

3、dao

IUserDao.java

1
2
3
4
5
6
7
8
9
10
11
12
13
14
15
16
17
18
19
20
21
package com.fatal.dao;

import com.fatal.entity.User;

/**
* User 数据库访问层
* @author: Fatal
* @date: 2018/10/14 0014 17:08
*/
public interface IUserDao {

/** 增或改 */
User insertOrUpdate(User user);

/** 删 */
User remove(Long id);

/** 查 */
User selectById(Long id);

}

UserDaoImpl.java

1
2
3
4
5
6
7
8
9
10
11
12
13
14
15
16
17
18
19
20
21
22
23
24
25
26
27
28
29
30
31
32
33
34
35
36
37
38
39
40
41
42
43
44
45
46
package com.fatal.dao.impl;

import com.fatal.dao.IUserDao;
import com.fatal.entity.User;
import org.springframework.stereotype.Repository;

import java.util.*;

/**
* User 数据库访问层实现
* @author: Fatal
* @date: 2018/10/14 0014 17:11
*/
@Repository
public class UserDaoImpl implements IUserDao {

/** 模拟数据库 */
private static Map<Long, User> db = new HashMap<>();

static {
// 初始化数据库
db.put(1l,new User().setId(1l).setUsername("米彩").setPassword("18"));
db.put(2l,new User().setId(2l).setUsername("米琪").setPassword("19"));
db.put(3l,new User().setId(3l).setUsername("小米").setPassword("20"));
}

@Override
public User insertOrUpdate(User user) {
if (user.getId() == null) {
user.setId(System.currentTimeMillis());
}
db.put(user.getId(), user);
return user;
}

@Override
public User remove(Long id) {
return db.remove(id);
}

@Override
public User selectById(Long id) {
return db.get(id);
}

}

4、service

IUserService.java

1
2
3
4
5
6
7
8
9
10
11
12
13
14
15
16
17
18
19
20
21
package com.fatal.service;

import com.fatal.entity.User;

/**
* User 服务
* @author: Fatal
* @date: 2018/10/14 0014 17:28
*/
public interface IUserService {

/** 增或改 */
User insertOrUpdate(User user);

/** 删 */
User remove(Long id);

/** 查 */
User selectById(Long id);

}

UserServiceImpl.java

声明式很简单,在指定方法上标注上对应的注解即可

1
2
3
4
5
6
7
8
9
10
11
12
13
14
15
16
17
18
19
20
21
22
23
24
25
26
27
28
29
30
31
32
33
34
35
36
37
38
39
40
41
42
43
44
45
46
47
48
package com.fatal.service.impl;

import com.fatal.dao.IUserDao;
import com.fatal.entity.User;
import com.fatal.service.IUserService;
import lombok.extern.slf4j.Slf4j;
import org.springframework.beans.factory.annotation.Autowired;
import org.springframework.cache.annotation.CacheEvict;
import org.springframework.cache.annotation.CachePut;
import org.springframework.cache.annotation.Cacheable;
import org.springframework.stereotype.Service;

/**
* @author: Fatal
* @date: 2018/10/14 0014 17:28
*/
@Slf4j
@Service
public class UserServiceImpl implements IUserService {

@Autowired
private IUserDao dao;

@Override
@CachePut(cacheNames = "user", key = "#user.id")
public User insertOrUpdate(User user) {
// 健壮性判断...
log.info("进入【insertOrUpdate】方法");
return dao.insertOrUpdate(user);
}

@Override
@CacheEvict(cacheNames = "user", key = "#id")
public User remove(Long id) {
// 健壮性判断...
log.info("进入【remove】方法");
return dao.remove(id);
}

@Override
@Cacheable(cacheNames = "user", key = "#id")
public User selectById(Long id) {
// 健壮性判断...
log.info("进入【selectById】方法");
return dao.selectById(id);
}

}

5、Application

使用@EnableCaching开启 Cache 缓存

1
2
3
4
5
6
7
8
9
10
11
12
13
14
package com.fatal;

import org.springframework.boot.SpringApplication;
import org.springframework.boot.autoconfigure.SpringBootApplication;
import org.springframework.cache.annotation.EnableCaching;

@SpringBootApplication
@EnableCaching // 启用缓存
public class Chapter15Application {

public static void main(String[] args) {
SpringApplication.run(Chapter15Application.class, args);
}
}

6、Test

UserServiceImplTest.java

测试缓存

1
2
3
4
5
6
7
8
9
10
11
12
13
14
15
16
17
18
19
20
21
22
23
24
25
26
27
28
29
30
31
32
33
34
35
36
37
38
39
40
41
42
43
44
45
46
47
48
49
50
51
52
53
54
55
56
57
58
59
60
package com.fatal.service.impl;

import com.fatal.entity.User;
import com.fatal.service.IUserService;
import lombok.extern.slf4j.Slf4j;
import org.junit.Test;
import org.junit.runner.RunWith;
import org.springframework.beans.factory.annotation.Autowired;
import org.springframework.boot.test.context.SpringBootTest;
import org.springframework.test.context.junit4.SpringRunner;

import static org.junit.Assert.*;

/**
* @author: Fatal
* @date: 2018/10/14 0014 17:32
*/
@Slf4j
@SpringBootTest
@RunWith(SpringRunner.class)
public class UserServiceImplTest {

@Autowired
private IUserService service;

@Test
public void insertOrUpdate() {
User user = new User().setUsername("micai").setPassword("18");
User result = service.insertOrUpdate(user);
log.info("【添加成功】 user -> {}", result);

result.setUsername("miqi");
result = service.insertOrUpdate(result);
log.info("【修改成功】 user -> {}", result);
}

@Test
public void remove() {
User result = service.remove(1l);
log.info("【删除成功】 user -> {}", result);
}

/**
* 使用该方法即可测试缓存的存在了
*/
@Test
public void selectById() {
User user = new User().setUsername("micai").setPassword("18");
User result = service.insertOrUpdate(user);
log.info("【添加成功】 user -> {}", result);

/**
* 因为在添加的时候已经把对象放到缓存中了,所以下面方法执行后,@Cacheable判断
* 出了有缓存,直接从缓存中拿数据,没进入方法体。所以没显示`进入【selectById】方法
*/
User select = service.selectById(result.getId());
log.info("【查询成功】 user -> {}", select);
}

}

Chapter15ApplicationTests.java

测试CacheManager的默认实现

1
2
3
4
5
6
7
8
9
10
11
12
13
14
15
16
17
18
19
20
21
22
23
24
25
26
27
package com.fatal;

import org.junit.Test;
import org.junit.runner.RunWith;
import org.springframework.beans.factory.annotation.Autowired;
import org.springframework.boot.test.context.SpringBootTest;
import org.springframework.cache.CacheManager;
import org.springframework.cache.concurrent.ConcurrentMapCacheManager;
import org.springframework.test.context.junit4.SpringRunner;

@RunWith(SpringRunner.class)
@SpringBootTest
public class Chapter15ApplicationTests {

@Autowired
private CacheManager cacheManager;

@Autowired
private ConcurrentMapCacheManager concurrentMapCacheManager;

@Test
public void contextLoads() {
System.out.println(cacheManager);
System.out.println(concurrentMapCacheManager);
}

}

显示

测试缓存

​ 执行测试方法 selectById ,在添加完后,添加数据被存放到缓存中,所以,后面查询的时候数据从缓存中取,所以没显示 进入【selectById】方法

1539530528763

测试CacheManager的默认实现

​ 用户没有作配置的情况下,CacheManager 取得是 ConcurrentMapCacheManager,所以下方显示为同一个 实例

1539567890228

笔记

根据条件操作缓存

根据条件操作缓存内容并不影响数据库操作,条件表达式返回一个布尔值,true/false,当条件为true,则进行缓存操作,否则直接调用方法执行的返回结果。

  • 长度: @CachePut(value = "user", key = "#user.id",condition = "#user.username.length() < 10") 只缓存用户名长度少于10的数据
  • 大小: @Cacheable(value = "user", key = "#id",condition = "#id < 10") 只缓存ID小于10的数据
  • 组合: @Cacheable(value="user",key="#user.username.concat(#user.password)")
  • 提前操作: @CacheEvict(value="user",beforeInvocation=true) 加上beforeInvocation=true后,不管内部是否报错,缓存都将被清除,默认情况为false

key 和 condition 的变量取自参数

注解介绍

@Cacheable (根据方法的请求参数对其结果进行缓存)

  • key: 缓存的 key,可以为空,如果指定要按照 SpEL 表达式编写,如果不指定,则缺省按照方法的所有参数进行组合(如:@Cacheable(value="user",key="#userName")
  • value: 缓存的名称,必须指定至少一个(如:@Cacheable(value="user") 或者 @Cacheable(value={"user1","use2"})
  • condition: 缓存的条件(针对参数),可以为空,使用 SpEL 编写,返回 true 或者 false,只有为 true 才进行缓存(如:@Cacheable(value = "user", key = "#id",condition = "#id < 10")
  • unless:缓存的条件(针对返回结果),可以为空,使用 SpEL 编写,返回 true 或者 false,只有为 true 才进行缓存(如:@Cacheable(value = "user", key = "#id", unless = "#result.getCode() != 0")result 指返回的对象,这里指 ResultVO。 因为错误的结果我们不可能缓存进来嘛)

@CachePut (根据方法的请求参数对其结果进行缓存,和 @Cacheable 不同的是,它每次都会触发真实方法的调用 )

注:它要求标注的方法的返回值类型与name相同的标注有@Cacheable方法的返回值类型一致,否则报错(类型转换异常)

  • key: 同上
  • value: 同上
  • condition: 同上

@CachEvict (根据条件对缓存进行清空)

  • key: 同上
  • value: 同上
  • condition: 同上
  • allEntries: 是否清空当前 value 下的所有缓存内容,缺省为 false,如果指定为 true,则方法调用后将立即清空所有缓存(如:@CacheEvict(value = "user", allEntries = true)

    注意:默认情况下,只删除关联 key下的缓存;需要特别注意的是,当 allEntries = true 时,不允许设置 key 值。(二选一)

  • beforeInvocation: 是否在方法执行前就清空,缺省为 false,如果指定为 true,则在方法还没有执行的时候就清空缓存,缺省情况下,如果方法执行抛出异常,则不会清空缓存(如:@CacheEvict(value = "user", key = "#id", beforeInvocation = true)

@CacheEvict 中的 allEntries 与 beforeInvocation 的区别

​ 在 Spring Cache 中,@CacheEvict 是清除缓存的注解。其中注解参数可以只有 valuekey ,意思是清除在 value 值空间中的 key 值数据,此时默认在当前注解方法成功执行之后再清除。这时候就会存在一个问题,也许你的注解方法成功执行了删除操作,但是后续代码 抛出异常 导致未能清除缓存,下次查询时依旧从缓存中去读取,这时查询到的结果值是删除操作之前的值。

​ 有一个简单的解决办法,在注解参数里面加上 beforeInvocationtrue,意思是说当执行这个方法之前执行清除缓存的操作,这样 不管这个方法执行成功与否,该缓存都将不存在。

​ 当注解参数加上 allEntriestrue 时,意思是说这个清除缓存是 清除 当前 value 值空间下 的所有缓存数据。

探究

为什么 CacheManager 的默认实现是 ConcurrentMapCacheManager?

​ 官方文档说:

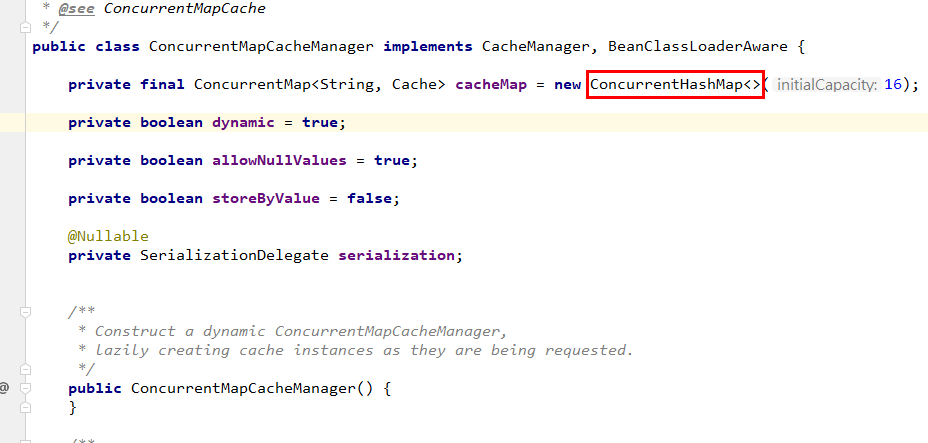
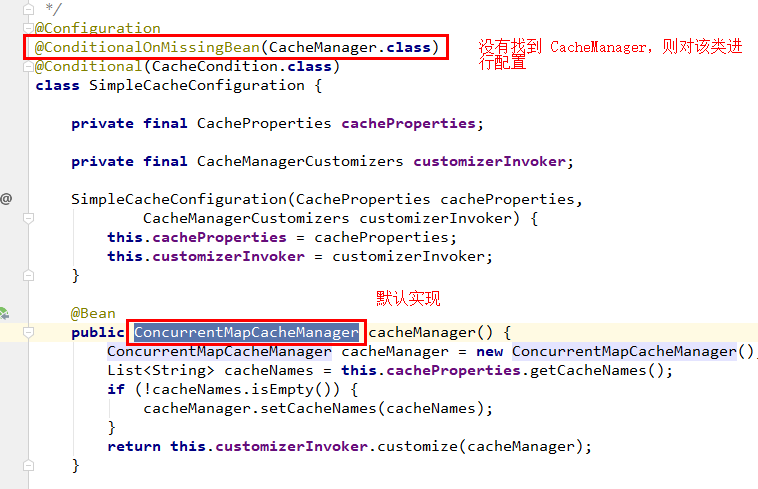
​ 如果找不到任何 CacheManager 的提供者(实现),那么将会以 ConcurrentMapCacheManager底层使用 ConcurrentHashMap)作为一个 简单的缓存管理器 从而进行默认配置。

​ 看一下源码:

这是缓存配置类 SimpleCacheConfiguration
1539566875395

这里是缓存管理器 ConcurrentCacheManager 的内部实现

1543393996796

1539566912084

分析

​ 其实所有的 Cache 缓存配置类,Spring Boot 都提供了默认 配置(就差你引入依赖就可以用了),我们引入 spring-boot-starter-data-cache 后,该依赖提供了 SimpleCacheConfiguration 需要的缓存管理器实现 ConcurrentMapCacheManager

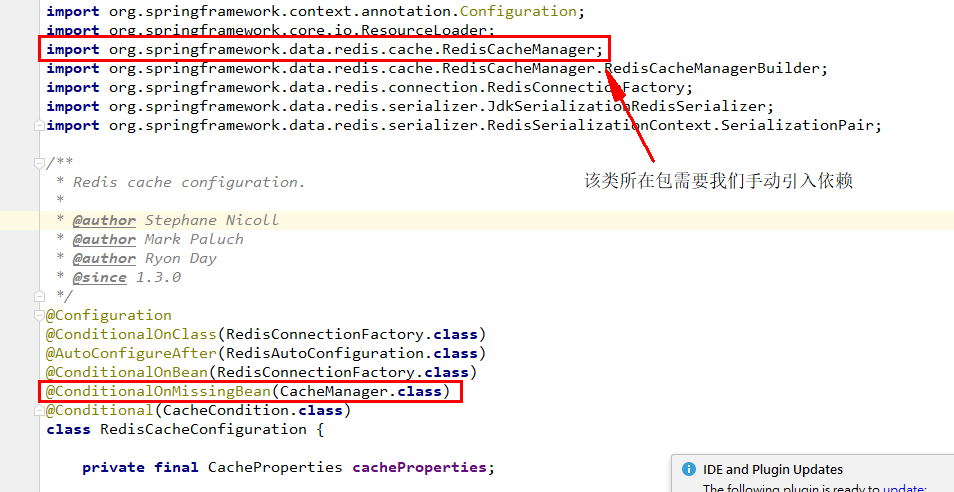
而像其它缓存管理器 实现,比如 Redis 缓存管理器 RedisCacheManager 需要的依赖 spring-boot-starter-data-redis,要求我们手动去添加;

当我们没有添加 指定管理器 需要的依赖, ConcurrentMapCacheManager 就成了 默认 的缓存管理器;当我们引入的话, SpringBoot 会扫描出来,并将其 替代 默认的缓存管理器。

(换行的话可能方便看)

​ 具体思路可参考源码:

1539567534452

参考资料

spring-cache文档

Spring Boot官方文档

SpringBoot非官方教程 | 第十三篇:springboot集成spring cache

一起来学SpringBoot | 第十篇:使用Spring Cache集成Redis

Spring缓存注解@Cacheable,@CachePut , @CacheEvict使用

Caching Data with Spring

总结

SpringBoot的知识已经有前辈在我们之前探索了。比较喜欢的博主有:唐亚峰 | Battcn方志朋的专栏程序猿DD纯洁的微笑。对这门技术感兴趣的可以去他们的博客逛逛。谢谢他们的分享~~

以上文章是我用来学习的Demo,都是基于 SpringBoot2.x 版本。

源码地址: https://github.com/ynfatal/springboot2-learning/tree/master/chapter15

学习 唐亚峰方志朋 前辈的经验