SpringBoot2 | 第十九篇:整合RabbitMQ(交换机类型 + 手动 ack)

SpringBoot 集成 RabbitMQ ,如果只是简单的使用配置非常少,SpringBoot 提供了 spring-boot-starter-amqp 项目对消息各种支持。上一篇基于默认消息交换机(direct),下面对三种常用的交换机(Direct、Topic、Fanout)进行演示

[TOC]

RabbitMQ介绍

AMQP,即Advanced Message Queuing Protocol,高级消息队列协议,是应用层协议的一个开放标准,为面向消息的中间件设计。消息中间件主要用于组件之间的解耦,消息的发送者无需知道消息使用者的存在,反之亦然。AMQP 的主要特征是 面向消息、队列、路由(包括点对点和发布/订阅)、可靠性、安全

RabbitMQ 是实现 AMQP高级消息队列协议)的消息中间件的一种,最初起源于金融系统,用于在分布式系统中存储转发消息,在 易用性、扩展性、高可用性 等方面表现不俗。RabbitMQ 服务器端用 Erlang 语言 编写,支持多种客户端,如:Python、Ruby、.NET、Java、JMS、C、PHP、ActionScript、XMPP、STOMP等,支持AJAX。支持延迟队列(这是一个非常有用的功能)….

环境/版本一览:

  • 开发工具:Intellij IDEA 2018.2.2
  • springboot: 2.0.6.RELEASE
  • jdk:1.8.0_171
  • maven:3.3.9
  • spring-boot-starter-amqp: 2.0.6.RELEASE

pom.xml

1
2
3
4
5
6
7
8
9
10
11
12
13
14
15
16
17
<dependencies>
<!-- RabbitMQ -->
<dependency>
<groupId>org.springframework.boot</groupId>
<artifactId>spring-boot-starter-amqp</artifactId>
</dependency>
<dependency>
<groupId>org.projectlombok</groupId>
<artifactId>lombok</artifactId>
<optional>true</optional>
</dependency>
<dependency>
<groupId>org.springframework.boot</groupId>
<artifactId>spring-boot-starter-test</artifactId>
<scope>test</scope>
</dependency>
</dependencies>

application.yml

1
2
3
4
5
6
7
8
9
10
11
spring:
rabbitmq:
username: guest # 默认为`guest`
password: guest # 默认为`guest`
host: localhost # 默认为`localhost`
port: 5672 # 默认为 5672
virtual-host: /
# 手动ACK,不开启自动ACK,目的是为了防止报错后未正确处理消息丢失;默认为`none`,不 ack
listener:
simple:
acknowledge-mode: manual

Direct

Direct 类型的交换器路由规则也很简单,它会把消息路由到那些 BindingKeyRoutingKey 完全匹配的队列中。

config

1
2
3
4
5
6
7
8
9
10
11
12
13
14
15
16
17
18
19
20
21
22
23
24
25
26
27
28
29
30
31
32
33
34
35
36
37
38
39
40
41
42
43
44
package com.fatal.direct.config;

import org.springframework.amqp.core.Binding;
import org.springframework.amqp.core.BindingBuilder;
import org.springframework.amqp.core.DirectExchange;
import org.springframework.amqp.core.Queue;
import org.springframework.beans.factory.annotation.Qualifier;
import org.springframework.context.annotation.Bean;
import org.springframework.context.annotation.Configuration;

/**
* @author: Fatal
* @date: 2019/7/6 0006 23:45
*/
@Configuration
public class DirectRabbitConfig {

public static final String DIRECT_EXCHANGE = "direct_exchange";

public static final String DIRECT_QUEUE = "direct_queue";

public static final String ROUTING_KEY = "ynfatal";


@Bean
public Queue directQueue() {
// 单参构造器(默认持久化)
return new Queue(DIRECT_QUEUE);
}

@Bean
public DirectExchange directExchange() {
// 单参构造器(默认持久化)
return new DirectExchange(DIRECT_EXCHANGE);
}

@Bean
public Binding directBinding(@Qualifier("directQueue") Queue queue, DirectExchange directExchange) {
return BindingBuilder.bind(queue)
.to(directExchange)
.with(ROUTING_KEY);
}

}

sender

1
2
3
4
5
6
7
8
9
10
11
12
13
14
15
16
17
18
19
20
21
22
23
24
25
26
27
28
29
30
31
package com.fatal.direct.sender;

import com.fatal.direct.config.DirectRabbitConfig;
import lombok.extern.slf4j.Slf4j;
import org.springframework.amqp.rabbit.core.RabbitTemplate;
import org.springframework.beans.factory.annotation.Autowired;
import org.springframework.stereotype.Component;

/**
* @author: Fatal
* @date: 2019/7/7 0007 0:03
*/
@Component
@Slf4j
public class DirectSender {

private RabbitTemplate rabbitTemplate;

@Autowired
public DirectSender(RabbitTemplate rabbitTemplate) {
this.rabbitTemplate = rabbitTemplate;
}

public void send() {
String message = "测试 DirectExchange";
log.info("【DirectSender发布消息】 -- [{}]", message);
rabbitTemplate.convertAndSend(DirectRabbitConfig.DIRECT_EXCHANGE,
DirectRabbitConfig.ROUTING_KEY, message);
}

}

receiver

1
2
3
4
5
6
7
8
9
10
11
12
13
14
15
16
17
18
19
20
21
22
23
24
25
26
27
28
29
30
31
32
33
34
35
36
37
38
39
40
41
42
43
44
package com.fatal.direct.receive;

import com.fatal.direct.config.DirectRabbitConfig;
import com.rabbitmq.client.Channel;
import lombok.extern.slf4j.Slf4j;
import org.springframework.amqp.core.Message;
import org.springframework.amqp.rabbit.annotation.RabbitListener;
import org.springframework.stereotype.Component;
import org.springframework.transaction.annotation.Transactional;

import java.io.IOException;
import java.time.LocalDateTime;

/**
* @author: Fatal
* @date: 2019/7/7 0007 0:10
*/
@Slf4j
@Component
public class DirectReceiver {

@Transactional(rollbackFor = Exception.class)
@RabbitListener(queues = {DirectRabbitConfig.DIRECT_QUEUE})
public void receive(String messages, Message message, Channel channel) throws Exception {
try {
log.info("【DirectReceiver接收到消息】 -- [{}]", messages);
/**
* @method void basicAck(long deliveryTag, boolean multiple) throws IOException
* @deliveryTag 指定队列要确认的已接收消息的标签(也叫传递标签)。新的队列默认的传递标签为0,代表接收过0条消息;
* 队列接收消息后,传递标签会从0开始累加。(传递标签de值也可以看成该队列接收的第n条消息)
* @multiple true: 用于确认提供的传递标签之前(包括提供的传递标签)指向的所有消息;
* false: 仅确认提供的传递标签指向的那条消息
*/
channel.basicAck(message.getMessageProperties().getDeliveryTag(), false);
} catch (IOException e) {
// TODO Ack失败的后续处理
log.error("【Ack失败】 time = {}", LocalDateTime.now());
} catch (Exception e) {
// TODO 业务异常的后续处理
log.error("【消费失败,业务异常】 time = {}", LocalDateTime.now());
throw new RuntimeException(e);
}
}
}

controller

1
2
3
4
5
6
7
8
9
10
11
12
13
14
15
16
17
18
19
20
21
22
23
24
25
26
27
28
29
package com.fatal.direct.controller;

import com.fatal.direct.sender.DirectSender;
import org.springframework.beans.factory.annotation.Autowired;
import org.springframework.web.bind.annotation.GetMapping;
import org.springframework.web.bind.annotation.RequestMapping;
import org.springframework.web.bind.annotation.RestController;

/**
* @author: Fatal
* @date: 2019/7/7 0007 0:15
*/
@RestController
@RequestMapping("/direct")
public class DirectController {

private DirectSender sender;

@Autowired
public DirectController(DirectSender sender) {
this.sender = sender;
}

@GetMapping
public void send() {
sender.send();
}

}

显示

访问 http://localhost:8080/direct方法

控制台如下

1562805836308

Fanout

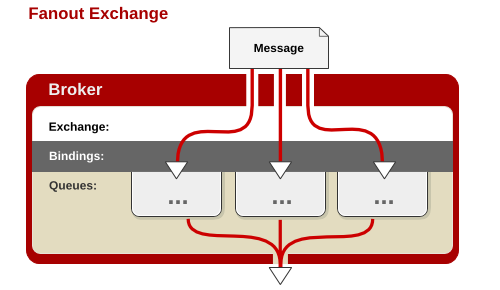
Fanout 就是我们熟悉的 广播模式或者发布/订阅模式,给 Fanout交换机 发送消息,绑定了这个交换机的所有队列都收到这个消息。
1540200618305

config

1
2
3
4
5
6
7
8
9
10
11
12
13
14
15
16
17
18
19
20
21
22
23
24
25
26
27
28
29
30
31
32
33
34
35
36
37
38
39
40
41
42
43
44
45
46
47
48
49
50
51
52
53
54
55
56
57
58
59
60
61
62
63
64
65
66
package com.fatal.fanout.config;

import org.springframework.amqp.core.Binding;
import org.springframework.amqp.core.BindingBuilder;
import org.springframework.amqp.core.FanoutExchange;
import org.springframework.amqp.core.Queue;
import org.springframework.context.annotation.Bean;
import org.springframework.context.annotation.Configuration;

/**
* FanoutRabbit 配置类
* @desc: A、B、C三个队列绑定到Fanout交换机上
* @author: Fatal
* @date: 2018/10/22 0022 16:52
*/
@Configuration
public class FanoutRabbitConfig {

public static final String FANOUT_EXCHANGE = "fanout_exchange";
public static final String FANOUT_A = "fanout.A";
public static final String FANOUT_B = "fanout.B";
public static final String FANOUT_C = "fanout.C";

@Bean
public Queue queueA() {
return new Queue(FANOUT_A);
}

@Bean
public Queue queueB() {
return new Queue(FANOUT_B);
}

@Bean
public Queue queueC() {
return new Queue(FANOUT_C);
}

/** Fanout交换机 */
@Bean
public FanoutExchange fanoutExchange() {
return new FanoutExchange(FANOUT_EXCHANGE);
}

@Bean
public Binding fanoutBindingA(Queue queueA, FanoutExchange fanoutExchange) {
return BindingBuilder
.bind(queueA)
.to(fanoutExchange);
}

@Bean
public Binding fanoutBindingB(Queue queueB, FanoutExchange fanoutExchange) {
return BindingBuilder
.bind(queueB)
.to(fanoutExchange);
}

@Bean
public Binding fanoutBindingC(Queue queueC, FanoutExchange fanoutExchange) {
return BindingBuilder
.bind(queueC)
.to(fanoutExchange);
}

}

sender

1
2
3
4
5
6
7
8
9
10
11
12
13
14
15
16
17
18
19
20
21
22
23
24
25
26
27
28
29
30
31
32
33
package com.fatal.fanout.sender;

import com.fatal.fanout.config.FanoutRabbitConfig;
import lombok.extern.slf4j.Slf4j;
import org.springframework.amqp.rabbit.core.RabbitTemplate;
import org.springframework.beans.factory.annotation.Autowired;
import org.springframework.stereotype.Component;

/**
* 发布者
* @author: Fatal
* @date: 2018/10/22 0022 17:02
*/
@Slf4j
@Component
public class FanoutSender {

private RabbitTemplate rabbitTemplate;

@Autowired
public FanoutSender(RabbitTemplate rabbitTemplate) {
this.rabbitTemplate = rabbitTemplate;
}

public void send() {
String message = "测试FanoutExchange实现发布与订阅";
log.info("【FanoutSender发布消息】 -- [{}]", message);
rabbitTemplate.convertAndSend(FanoutRabbitConfig.FANOUT_EXCHANGE, "", message);
}


}

receiver

1
2
3
4
5
6
7
8
9
10
11
12
13
14
15
16
17
18
19
20
21
22
23
24
25
26
27
28
29
30
31
32
33
34
35
36
37
38
39
40
41
42
43
44
45
46
47
48
49
50
51
52
53
54
55
56
57
58
59
60
61
62
63
64
65
66
67
68
69
70
71
package com.fatal.fanout.receiver;

import com.fatal.fanout.config.FanoutRabbitConfig;
import com.rabbitmq.client.Channel;
import lombok.extern.slf4j.Slf4j;
import org.springframework.amqp.core.Message;
import org.springframework.amqp.rabbit.annotation.RabbitListener;
import org.springframework.stereotype.Component;

import java.io.IOException;
import java.time.LocalDateTime;

/**
* 接收者(订阅)
* @author: Fatal
* @date: 2018/10/22 0022 17:03
*/
@Slf4j
@Component
public class FanoutReceiver {

@RabbitListener(queues = {FanoutRabbitConfig.FANOUT_A})
public void receiveMessageA(String messages, Message message, Channel channel) {
try {
log.info("【FanoutReceiverA接收到消息】 -- [{}]", messages);
/**
* @method void basicAck(long deliveryTag, boolean multiple) throws IOException
* @deliveryTag 指定队列要确认的已接收消息的标签(也叫传递标签)。新的队列默认的传递标签为0,代表接收过0条消息;
* 队列接收消息后,传递标签会从0开始累加。(传递标签de值也可以看成该队列接收的第n条消息)
* @multiple true: 用于确认提供的传递标签之前(包括提供的传递标签)指向的所有消息;
* false: 仅确认提供的传递标签指向的那条消息
*/
channel.basicAck(message.getMessageProperties().getDeliveryTag(), false);
} catch (IOException e) {
// TODO Ack失败的后续处理
log.error("【Ack失败】 time = {}", LocalDateTime.now());
} catch (Exception e) {
// TODO 业务异常的后续处理
log.error("【消费失败,业务异常】 time = {}", LocalDateTime.now());
}
}

@RabbitListener(queues = {FanoutRabbitConfig.FANOUT_B})
public void receiveMessageB(String messages, Message message, Channel channel) {
try {
log.info("【FanoutReceiverB接收到消息】 -- [{}]", messages);
channel.basicAck(message.getMessageProperties().getDeliveryTag(), false);
} catch (IOException e) {
// TODO Ack失败的后续处理
log.error("【Ack失败】 time = {}", LocalDateTime.now());
} catch (Exception e) {
// TODO 业务异常的后续处理
log.error("【消费失败,业务异常】 time = {}", LocalDateTime.now());
}
}

@RabbitListener(queues = {FanoutRabbitConfig.FANOUT_C})
public void receiveMessageC(String messages, Message message, Channel channel) {
try {
log.info("【FanoutReceiverC接收到消息】 -- [{}]", messages);
channel.basicAck(message.getMessageProperties().getDeliveryTag(), false);
} catch (IOException e) {
// TODO Ack失败的后续处理
log.error("【Ack失败】 time = {}", LocalDateTime.now());
} catch (Exception e) {
// TODO 业务异常的后续处理
log.error("【消费失败,业务异常】 time = {}", LocalDateTime.now());
}
}

}

controller

1
2
3
4
5
6
7
8
9
10
11
12
13
14
15
16
17
18
19
20
21
22
23
24
25
26
27
28
29
30
package com.fatal.fanout.controller;

import com.fatal.fanout.sender.FanoutSender;
import org.springframework.beans.factory.annotation.Autowired;
import org.springframework.web.bind.annotation.GetMapping;
import org.springframework.web.bind.annotation.RequestMapping;
import org.springframework.web.bind.annotation.RestController;

/**
* @author: Fatal
* @date: 2019/7/6 0006 10:45
*/
@RestController
@RequestMapping("/fanout")
public class FanoutController {

private FanoutSender sender;

@Autowired
public FanoutController(FanoutSender sender) {
this.sender = sender;
}

@GetMapping
public void send() {
// 发布
sender.send();
}

}

显示

访问 http://localhost:8080/fanout 方法

控制台如下

1562805963245

Topic

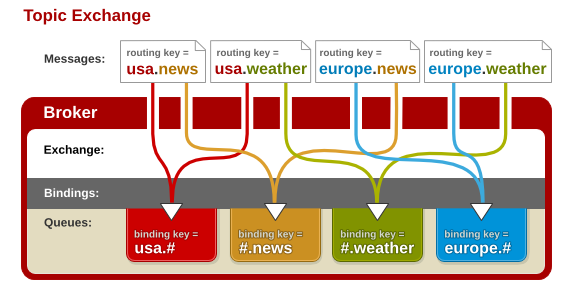
topicRabbitMQ 中最灵活的一种方式,可以根据 routing_key 自由的绑定不同的队列
1540200631359

entity

注意:因为要通过网络传输发送给 RabbitMQ 服务器,所以需要实现序列化

1
2
3
4
5
6
7
8
9
10
11
12
13
14
15
16
17
18
19
20
21
22
package com.fatal.topic.entity;

import lombok.AllArgsConstructor;
import lombok.Data;
import lombok.NoArgsConstructor;

import java.io.Serializable;

/**
* @author: Fatal
* @date: 2018/10/22 0022 15:55
*/
@Data
@AllArgsConstructor
@NoArgsConstructor
public class User implements Serializable {

private Long id;
private String username;
private String password;

}

config

1
2
3
4
5
6
7
8
9
10
11
12
13
14
15
16
17
18
19
20
21
22
23
24
25
26
27
28
29
30
31
32
33
34
35
36
37
38
39
40
41
42
43
44
45
46
47
48
49
50
51
52
53
54
55
56
57
58
59
60
61
62
63
64
65
66
67
68
69
70
71
package com.fatal.topic.config;

import org.springframework.amqp.core.Binding;
import org.springframework.amqp.core.BindingBuilder;
import org.springframework.amqp.core.Queue;
import org.springframework.amqp.core.TopicExchange;
import org.springframework.beans.factory.annotation.Qualifier;
import org.springframework.context.annotation.Bean;
import org.springframework.context.annotation.Configuration;

/**
* RabbitMQ 配置类
* @author: Fatal
* @date: 2018/10/22 0022 14:55
*/
@Configuration
public class TopicRabbitMQConfig {

public static final String TOPIC_EXCHANGE = "topic_exchange";

public static final String TOPIC_QUEUE = "topic_queue";

private static final String BINDING_KEY = "fatal.#";

@Bean
public Queue topicQueue() {
return new Queue(TOPIC_QUEUE, true);
}

/** Topic交换机 */
@Bean
public TopicExchange exchange() {
return new TopicExchange(TOPIC_EXCHANGE);
}

/**
* binding组件
* `@Qualifier`: 当容器中出现同种类型的多个组件上,需要用`@Qualifier`来指定使用哪个
* 将队列与交换机进行绑定并设置其`路由`
* `fatal.#`:这里的`#`表示匹配所有的意思
*/
@Bean
public Binding topicBinding(@Qualifier("topicQueue") Queue queue, TopicExchange exchange) {
return BindingBuilder
.bind(queue)
.to(exchange)
.with(BINDING_KEY);
}

/**
* 使用这种方式也可以一个消费者同时订阅多个queue
* 这种方式与在消费者中用@RabbitListener@RabbitListener+@RabbitHandler组合 两种指定队列的方式效果一致。
* 注意:三种方式的消费者记得加 @Component。因为它必须是个组件
*/
/*@Bean
public SimpleMessageListenerContainer container(ConnectionFactory connectionFactory,
MessageListenerAdapter listenerAdapter) {
SimpleMessageListenerContainer container = new SimpleMessageListenerContainer();
container.setConnectionFactory(connectionFactory);
container.setQueueNames(TopicRabbitMQConfig.TOPIC_QUEUE);
container.setMessageListener(listenerAdapter);
return container;
}

@Bean
public MessageListenerAdapter listenerAdapter(TopicReceiver topicReceiver) {
// 对接收者`Receiver`进行封装,指定接收消息de方法为`receiveMessage`
return new MessageListenerAdapter(topicReceiver, "receiveMessage");
}*/

}

sender

1
2
3
4
5
6
7
8
9
10
11
12
13
14
15
16
17
18
19
20
21
22
23
24
25
26
27
28
29
30
31
package com.fatal.topic.sender;

import com.fatal.topic.config.TopicRabbitMQConfig;
import com.fatal.topic.entity.User;
import lombok.extern.slf4j.Slf4j;
import org.springframework.amqp.rabbit.core.RabbitTemplate;
import org.springframework.beans.factory.annotation.Autowired;
import org.springframework.stereotype.Component;

/**
* 发布者
* @author: Fatal
* @date: 2018/10/22 0022 15:52
*/
@Slf4j
@Component
public class TopicSender {

private RabbitTemplate rabbitTemplate;

@Autowired
public TopicSender(RabbitTemplate rabbitTemplate) {
this.rabbitTemplate = rabbitTemplate;
}

public void send() {
User user = new User(1L, "fatal", "123");
log.info("【Sender发布的User信息】:[{}]", user);
rabbitTemplate.convertAndSend(TopicRabbitMQConfig.TOPIC_EXCHANGE, "fatal.user" ,user);
}
}

receiver

1
2
3
4
5
6
7
8
9
10
11
12
13
14
15
16
17
18
19
20
21
22
23
24
25
26
27
28
29
30
31
32
33
34
35
36
37
38
39
40
41
42
43
44
45
46
package com.fatal.topic.receiver;

import com.fatal.topic.config.TopicRabbitMQConfig;
import com.fatal.topic.entity.User;
import com.rabbitmq.client.Channel;
import lombok.extern.slf4j.Slf4j;
import org.springframework.amqp.core.Message;
import org.springframework.amqp.rabbit.annotation.RabbitHandler;
import org.springframework.amqp.rabbit.annotation.RabbitListener;
import org.springframework.stereotype.Component;

import java.io.IOException;
import java.time.LocalDateTime;

/**
* 接收者
* @author: Fatal
* @date: 2018/10/22 0022 15:09
*/
@Slf4j
@Component
@RabbitListener(queues = TopicRabbitMQConfig.TOPIC_QUEUE)
public class TopicReceiver {

@RabbitHandler
public void receiveMessage(User user, Message message, Channel channel) {
try {
log.info("【接收的User信息】--[{}]", user);
/**
* @method void basicAck(long deliveryTag, boolean multiple) throws IOException
* @deliveryTag 指定队列要确认的已接收消息的标签(也叫传递标签)。新的队列默认的传递标签为0,代表接收过0条消息;
* 队列接收消息后,传递标签会从0开始累加。(传递标签de值也可以看成该队列接收的第n条消息)
* @multiple true: 用于确认提供的传递标签之前(包括提供的传递标签)指向的所有消息;
* false: 仅确认提供的传递标签指向的那条消息
*/
channel.basicAck(message.getMessageProperties().getDeliveryTag(), false);
} catch (IOException e) {
// TODO Ack失败的后续处理
log.error("【Ack失败】 time = {}", LocalDateTime.now());
} catch (Exception e) {
// TODO 业务异常的后续处理
log.error("【消费失败,业务异常】 time = {}", LocalDateTime.now());
}
}

}

controller

1
2
3
4
5
6
7
8
9
10
11
12
13
14
15
16
17
18
19
20
21
22
23
24
25
26
27
28
29
package com.fatal.topic.controller;

import com.fatal.topic.sender.TopicSender;
import org.springframework.beans.factory.annotation.Autowired;
import org.springframework.web.bind.annotation.GetMapping;
import org.springframework.web.bind.annotation.RequestMapping;
import org.springframework.web.bind.annotation.RestController;

/**
* @author: Fatal
* @date: 2019/7/6 0006 8:55
*/
@RestController
@RequestMapping("/topic")
public class TopicController {

private TopicSender sender;

@Autowired
public TopicController(TopicSender sender) {
this.sender = sender;
}

@GetMapping
public void send() {
sender.send();
}

}

显示

访问 http://localhost:8080/topic 方法

控制台如下

1562806132416

笔记

基础概念

Broker:简单来说就是消息队列服务器实体
Exchange:消息交换机,它指定消息按什么规则,路由到哪个队列
Queue:消息队列载体,每个消息都会被投入到一个或多个队列
Binding:绑定,它的作用就是把exchangequeue按照路由规则绑定起来,在绑定的时候一定会指定一个绑定键“Binding Key
Routing Key:路由关键字,exchange根据这个关键字进行消息投递
vhost:虚拟主机,一个broker里可以开设多个vhost,用作不同用户的权限分离
producer:消息生产者,就是投递消息的程序
consumer:消息消费者,就是接受消息的程序
channel:消息通道,在客户端的每个连接里,可建立多个channel,每个channel代表一个会话任务

常见应用场景

  1. 邮箱发送:用户注册后投递消息到rabbitmq中,由消息的消费方异步的发送邮件,提升系统响应速度
  2. 流量削峰:一般在 秒杀活动 中应用广泛,秒杀会因为流量过大,导致应用挂掉,为了解决这个问题,一般在应用前端加入消息队列。用于控制活动人数,将超过此一定阀值的订单直接丢弃。缓解短时间的高流量压垮应用。
  3. 订单超时:利用rabbitmq延迟队列,可以很简单的实现 订单超时 的功能,比如用户在下单后30分钟未支付取消订单
  4. 还有更多应用场景就不一一列举了…..

怎么知道没有配置交换机的时候是使用Direct作为默认交换机呢?

点开 RabbitTemplate 的源码来看一下

它这里定义了一个常量 DEFAULT_EXCHANGE

1540028823076

然后,当我们使用 RabbitTemplate 发布消息的时候,如果我们没有指定交换机,那么调用的方法类似下面的 convertAndSend(String routingKey, final Object object) ,可以看出,它帮我们指定了默认的交换机了。

1540028970290

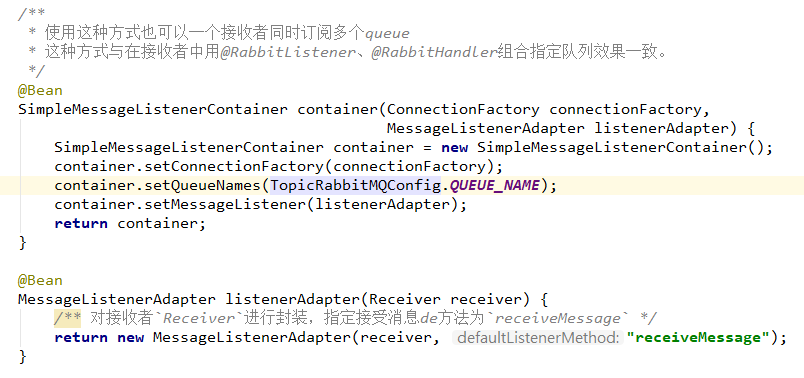
配置监听器订阅内容de三种方式

1、SimpleMessageListenerContainer + MessageListenerAdapter
1540197612577

2、@RabbitListener + @RabbitHandler(后面提及的序列化将会对此方法展开描述)
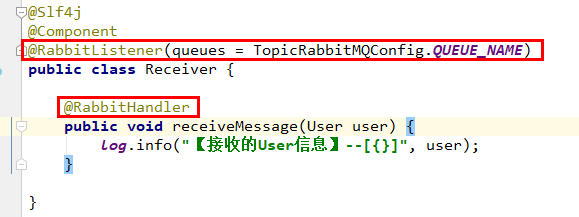
1540197641901

3、@RabbitListener

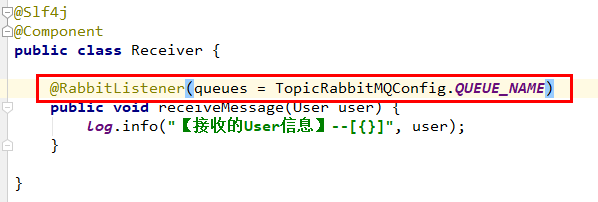
1540197674924

参考资料

springboot(八):RabbitMQ详解

一起来学SpringBoot | 第十二篇:初探RabbitMQ消息队列

Messaging with RabbitMQ

总结

SpringBoot的知识已经有前辈在我们之前探索了。比较喜欢的博主有:唐亚峰 | Battcn方志朋的专栏程序猿DD纯洁的微笑。对这门技术感兴趣的可以去他们的博客逛逛。谢谢他们的分享~~

以上文章是我用来学习的Demo,都是基于 SpringBoot2.x 版本。

源码地址: https://github.com/ynfatal/springboot2-learning/tree/master/chapter19_2

学习 唐亚峰纯洁的微笑 前辈的经验